Final Warning in regards to Existing/Old Builds Stable Diffusion WebUI copies
This guide only works for up-to-date Stable Diffusion WebUI versions. If you are on a old version of Stable Diffusion WebUI, update it viagit pullor the manual update method that Automatic1111 covers in his wiki.
If you are unsure if your version is old or if you are missing features, justgit pullor manually update Stable Diffusion WebUI.
Continuing with this guide further with a old version of Stable Diffusion will result in some steps not being able to be executed properly. You have been warned twice.
Now that we have Stable Diffusion setup, let's first get familiar with the WebUI itself and understand what each thing does. We will cover the important bits that are important for us to generate our image.
Be advised that Stable Diffusion is not a easy and fast process. It involves a lot of trial and error in order to produce something that you deem 'good enough'. In the case for Bronya, she took me around three days (excluding time on Honkai: Star Rail to gather image references) in order to complete all 28 of her expressions for her sprite set. Expect this to delay your character release if you are on a deadline.
¶ Stable Diffusion Checkpoint
This part here is where you select the model you wish to load into Stable Diffusion. Make sure this is set to the AnyLoRA model you downloaded back in Pre-creation.
¶ Understanding 'txt2img'
If you are using existing sprites, you may skip this section and move to Using 'inpainting'
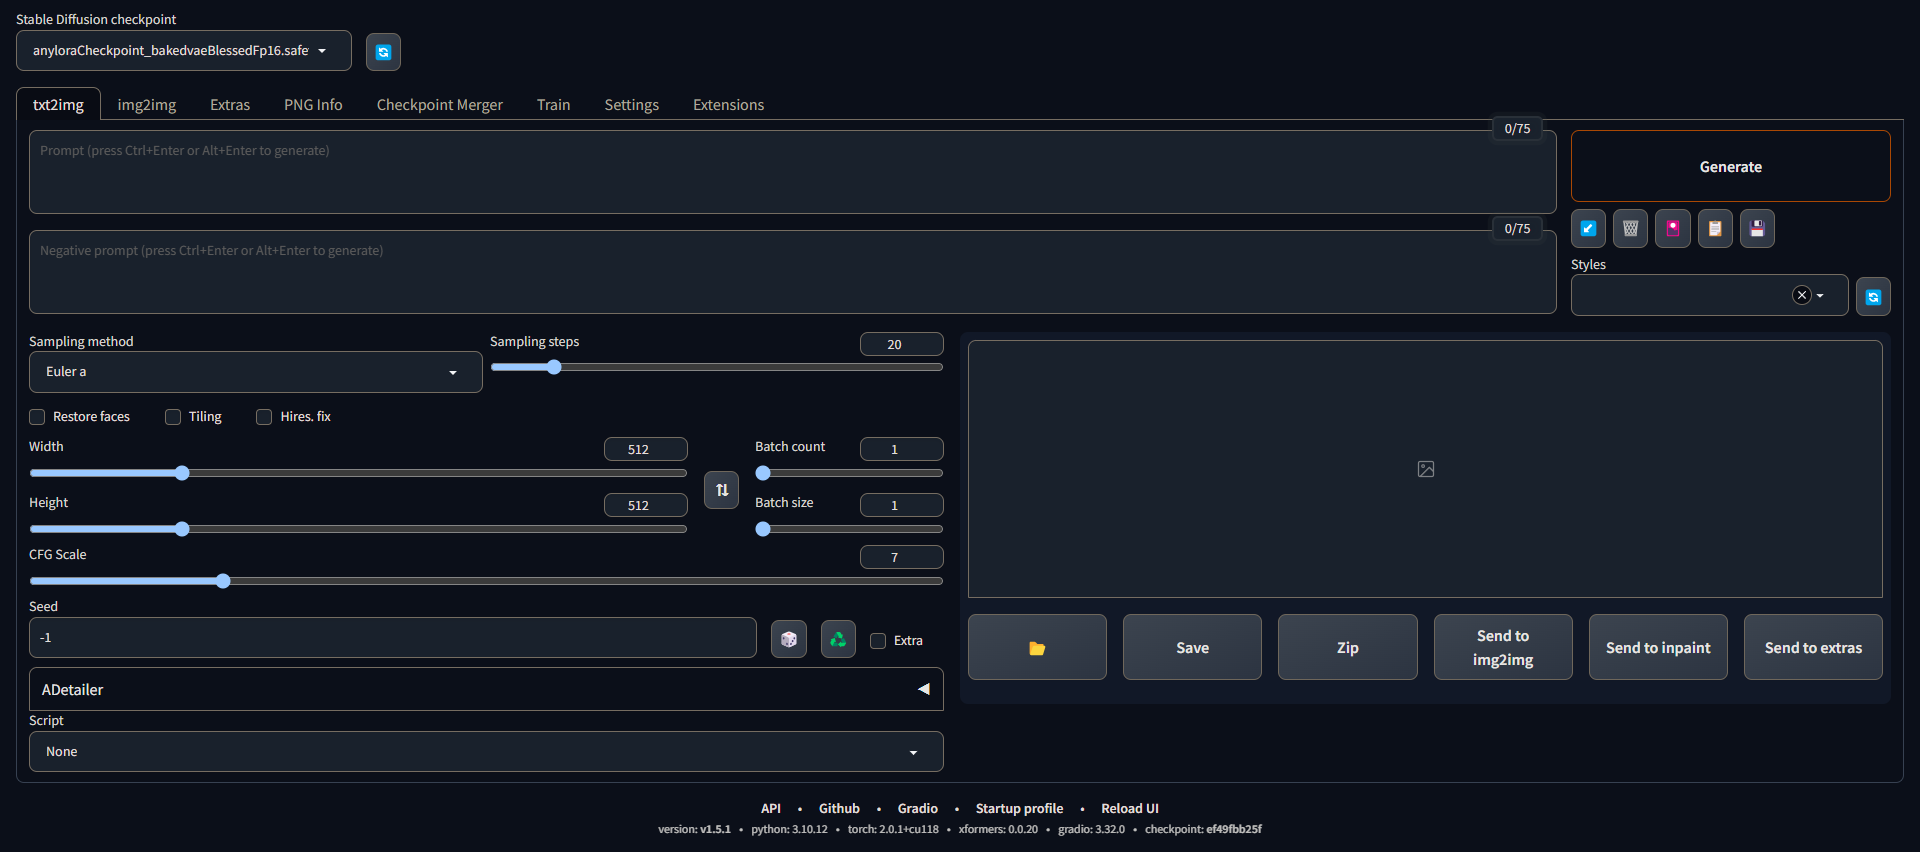
¶ Prompt
This is where we are going to specify what we want our image to look like with the background, character and the environment in of itself. We will cover setting up this screen later but for now, type in masterpiece, best quality into the prompt.
¶ Negative prompt (Blacklist)
The opposite of prompt. Here we add things we do not want to include in or image and where we add embeddings that are meant to remove things on here. Basically treat this section as a I don't want X,Y,Z. For now, just put in low quality, worst quality in this section.
¶ Sampling method
This part is used to select the sample method to create your image. Each sample method can generate different results and colors depending on the one listed so this is up to you to experiment with and find which sampler matches the pallete you want, however for the rest of this guide, we will be using DPM++ 2M Karras.
¶ Sampling steps
This part is used to determine how many steps the sampler should go through in order to create your image. A too low sample step will produce garbage while a too high sample step will make the process take longer and risk producing side effects in the image. We recommend using a sample step between 30-40 when making sprites here.
¶ Width/Height
This part is where you configure the resolution of your outputted image.
¶ CFG Scale
This part controls how much Stable Diffusion will follow your prompt. Higher CFG values will stick to your prompt more but it can cause a dissorted image, while a lower CFG scale will make a better image that sticks to the prompt less.
¶ Seed
This is the random value used to generate your image. -1 tells Stable Diffusion to generate a random value to make the image while any other number is a set seed for the output you have generated.
Use the dice button to revert the seed value to
-1.
Use the recycle button to use the seed of the image you generated.
¶ Using 'txt2img'
If you are using existing sprites, you may skip this section and move to Using 'inpainting'
Now that we learned most of the options we will be using to generate our images, let's begin working on making sprites!
First go to your prompt and begin with the following tags
masterpiece, best quality, solo, simple background
In this section we added solo and simple background which tells Stable Diffusion that we want to make a image that is of one person and a simple color background. The latter will be useful when we begin to remove the backgrounds from our art.
You can also use
<color> background(i.e. green background) instead if you don't get simple backgrounds.
After this, let's start describing the character's appearance and their clothes. This will be important whether or not you have a LoRA or not. Simply describe in the prompt the eye and hair color, length of hair, hair designs, parts of their outfit, etc. This might be a lot and may require you to use sources like Danbooru for booru tag descriptions.
If you have a LoRA of your character, you can get away with a smaller description of your character, however if you are doing a OC or a character without a LoRA, you will have to try to describe them in full detail.
In the case for Bronya Rand, since I do have a LoRA for her, I can describe her characteristics less and decided to describe her to Stable Diffusion in this form.
masterpiece, best quality, solo, simple background, grey eyes, earring, brown elbow gloves, brown bodystocking, black boots
Do note that even with a LoRA, you may need to enforce more things for the character if certain pieces are missing. In the case of Bronya, when I was generating her, I had to add
brown elbow glovesand a few other pieces to make certain items of her appear.
Once you got your characters' descriptions down, we now move into determining the camera and eye positions for them. This can either be the character looking at you, and the camera being in a body shot position. Consider carefully the direction you want your character to face the viewer in SillyTavern. Our recommendation is to have the character look at the viewer and have the character visible from above the thighs. This is how it would look like with Bronya.
masterpiece, best quality, bronyarand, solo, simple background, grey eyes, earring, brown elbow gloves, brown bodystocking, black boots, cowboy shot, looking at viewer
You can additionally add more information on poses your character should make in the image for added enforcement such as having a finger on their cheek and such like the following example:
masterpiece, best quality, bronyarand, solo, simple background, grey eyes, earring, brown elbow gloves, brown bodystocking, black boots, cowboy shot, looking at viewer, finger on cheek
Now with that done, if you have a LoRA, I suggest you add it by clicking on the image icon in red > Lora, and select the LoRA of your choosing.
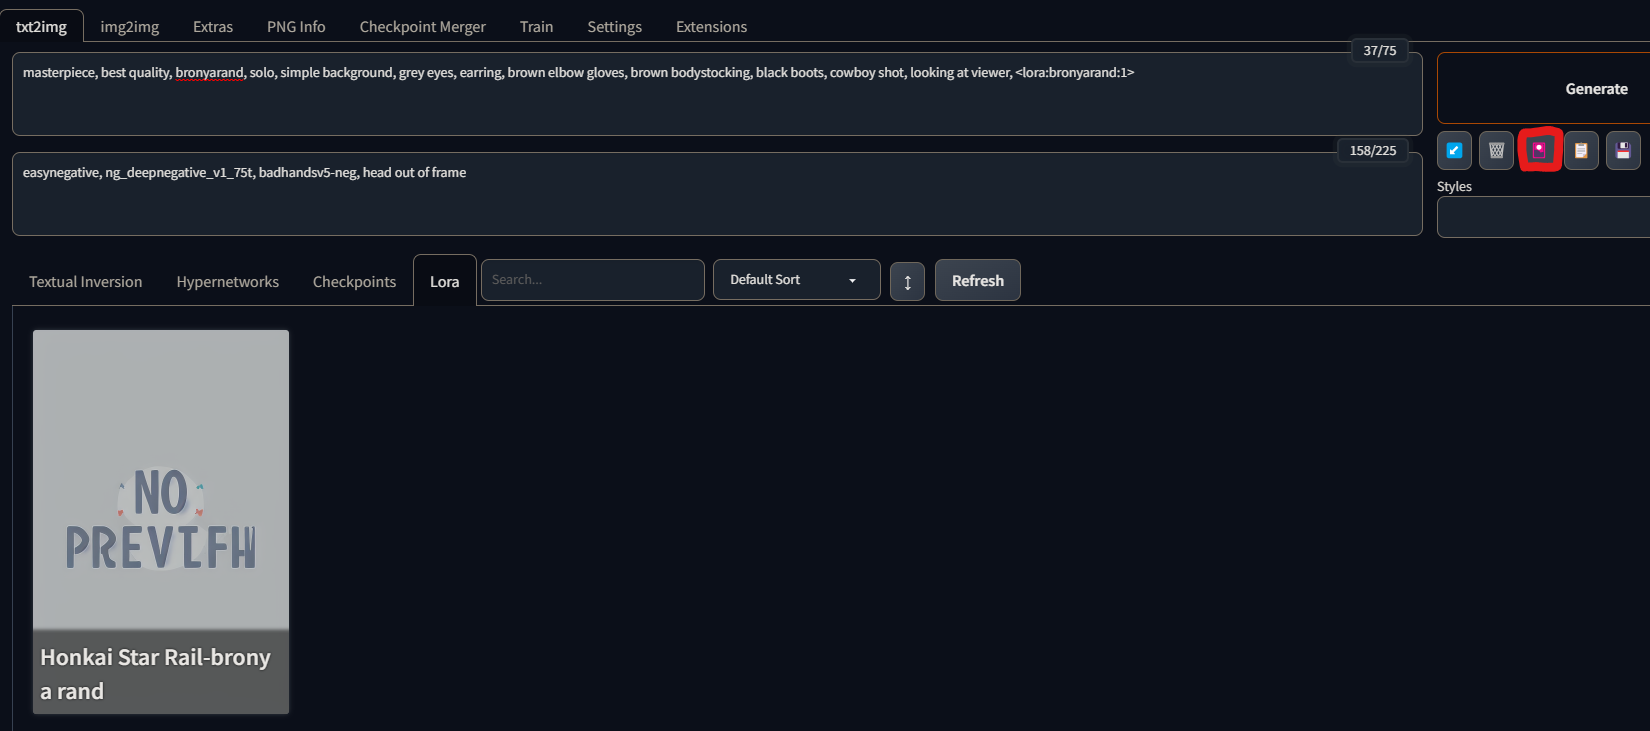
The end result should be something like this (exclude the LoRA part if you don't have a LoRA).
masterpiece, best quality, bronyarand, solo, simple background, grey eyes, earring, brown elbow gloves, brown bodystocking, black boots, cowboy shot, looking at viewer, <lora:bronyarand:1>
With your prompt now done, let's move to the Negative Prompt (Blacklist) and insert the following into it.
worst quality, bad quality, easynegative, ng_deepnegative_v1_75t, badhandsv5-neg
In here you can also add things you do not wish to see in the image. This is useful for things that are commonly placed incorrectly, added as a extra, broken anatomy, etc. Use this spot as a trial and error to remove things that may sometimes appear for a new generation that fits nothing to the original image. In the case of Bronya, I added head out of frame as some generations had her hair placed outside the canvas.
worst quality, bad quality, easynegative, ng_deepnegative_v1_75t, badhandsv5-neg, head out of frame
With that done, configure the size of the image you want it to be, how much CFG you wish to see, your sample steps and begin generating! It might take a while to produce a base image, but at the end of the day you should get a image that you feel is good for you like the following Bronya result.
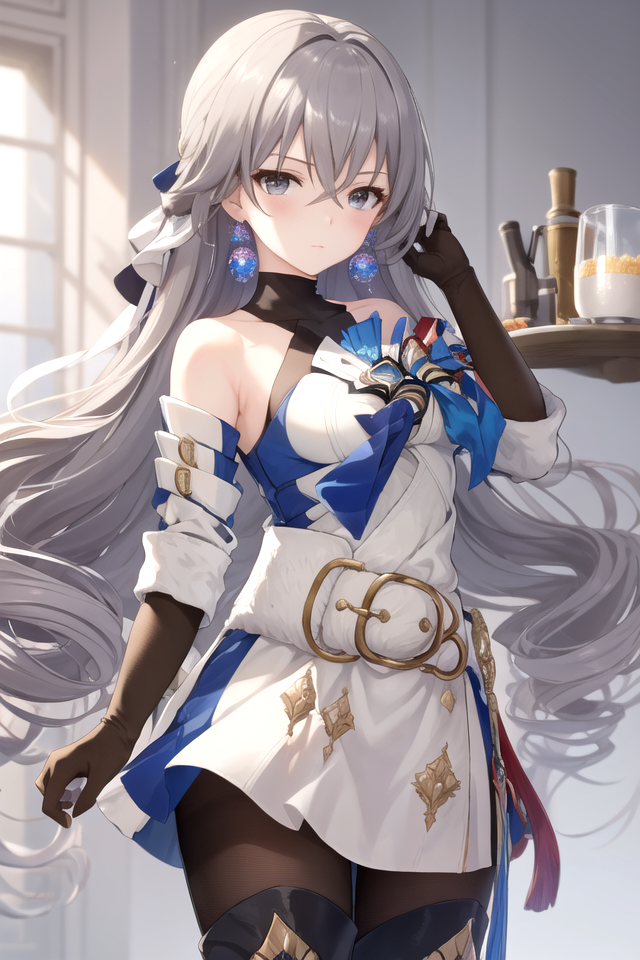
Bronya Bronya. <3
Once you have a image you are happy with, save it to your PC just in case you need to refer back to it. Afterwards, click on Send to inpaint and we can continue making our character by making multiple expressions with the same pose, using inpainting.
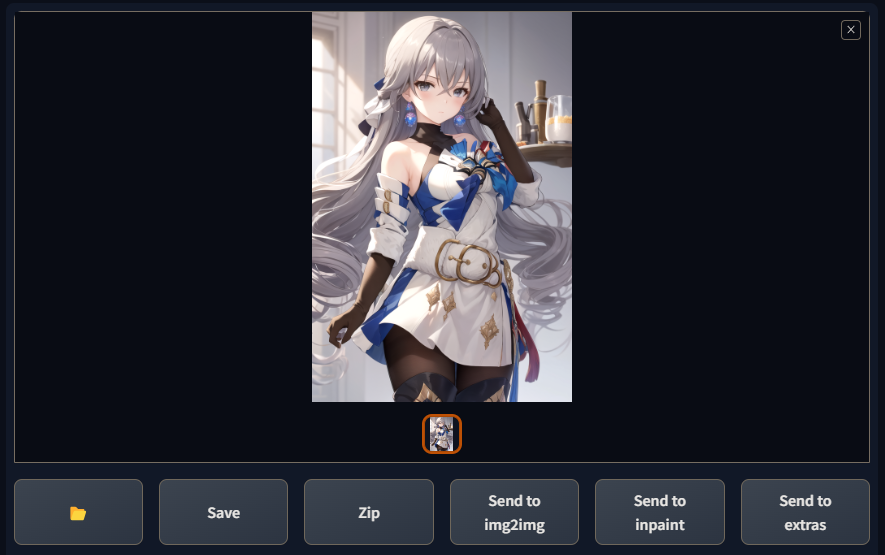
If you are happy with the result but wish parts of the image were more visible as they have been cut off (like the image above), you can instead select Send to img2img, adjust the size of the image to what you like, save the new image and use it for inpainting instead.
¶ Understanding 'inpainting'
If you are using existing sprites, make sure they are not transparent. If they are, I suggest adding a background to the image before doing this step as inpainting with a transparent background will cause issues with the output result.
To create multiple expressions for the image we just generated, we will need to use inpainting (which is located in the img2img tab of Stable Diffusion). Inpainting is a technique used to replace sections of a already given image with something else. The reason why we are just generating expressions via Inpainting compared to img2img is the following:
- Even with the same key, adding a expression like
happyand then changing it tosadcan alter more than just the face, even with the same seed.Each seed differs depending on the prompt. Altering it by adding different expressions, can result in changes to the outfit, hair, and other minor things that isn't consistent to the original design.
To try and keep consistency in someway, it is better to just inpaint a section with something new, than just re-do the whole image entirely. This also allows us to use an even smaller prompt, since we are focusing just on how we want the face to appear. Let's cover all the setting available with inpainting here.
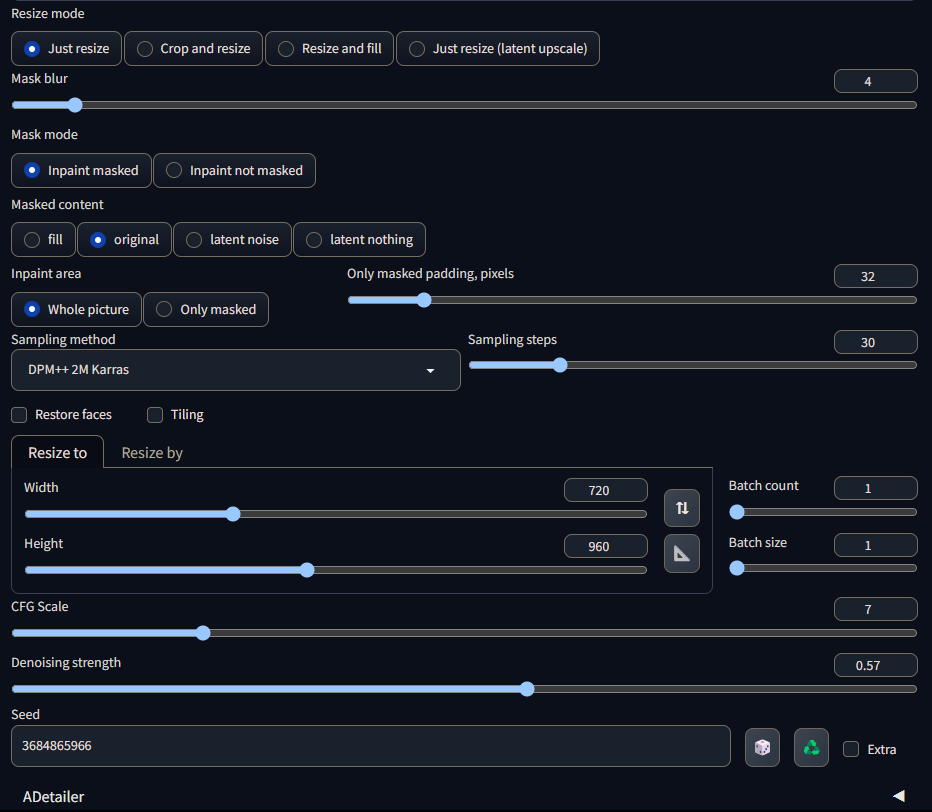
¶ Resize mode
Resize mode tells Stable Diffusion what to do with the image itself. For now, set this to Resize & refill
¶ Mask blur
This setting manages the blur effect that appears when you are inpainting using Gaussian Blur. Leave this at 4.
¶ Mask mode
Mask mode controls whether gaussian blur is applied to the inpainted section or the image around the inpaint. Leave this as Inpaint masked.
¶ Masked content
This part tells Stable Diffusion what it should make in the inpainting section. Leave this as original.
¶ Inpaint area
This setting controls whether Inpaint, occurs on the whole image or the inpaint selection. Leave it at Only masked and leave Only masked padding, pixels to 32.
¶ Sampling method
Leave this setting to what your image originally was (which should have been transferred when you sent the image to inpainting itself.
¶ Resize to/Resize by
Select Resize to and set it to the resolution of your image (using the triangle icon).
¶ CFG Scale
Leave this setting to what your image originally was (which should have been transferred when you sent the image to inpainting itself.
¶ Denoising strength
Denoising strength basically tells Stable Diffusion how much it references the original image to something completely new. Anything close to 0 sticks to the original look of the image but is harder to change, but something bigger than one will make the inpaint like your prompt but may not look close to the original colors of the image. I recommend reducing this down to keep the image close to original, but different (around .25-.4) as we will be more focusing on this setting in Adetailer. For Bronya, I used a strength of 0.37 here.
¶ Adetailer
Adetailer is the extension we install and we will mostly be enforcing the expressions we want here instead of the prompt above for better image expression results.
¶ Using 'inpainting'
To begin inpainting, cover up the face of your image like so. This will allow Stable Diffusion to know what to inpaint.
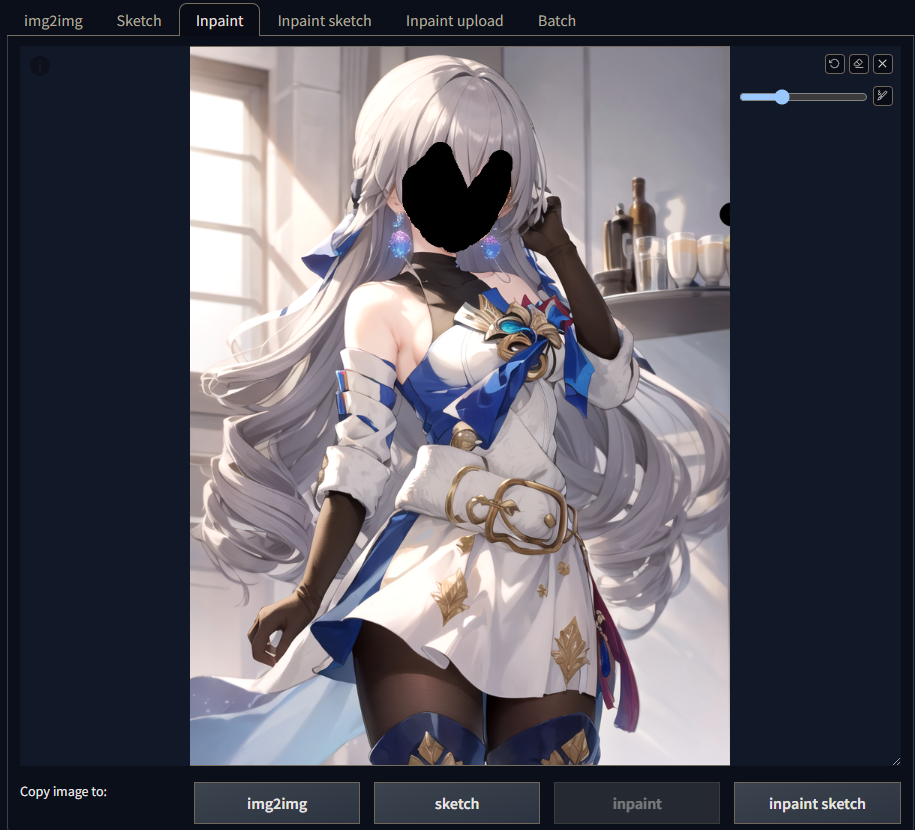
Since we already have our image and a LoRA for Bronya, we don't really need all the same information we needed to make the image when inpainting. For now remove everything here but the LoRA tag.

If you do not have a LoRA, you can leave it blank or leave in some things you know Stable Diffusion will struggle with.
Leave your Negative prompt as-is and let's move to Adetailer.
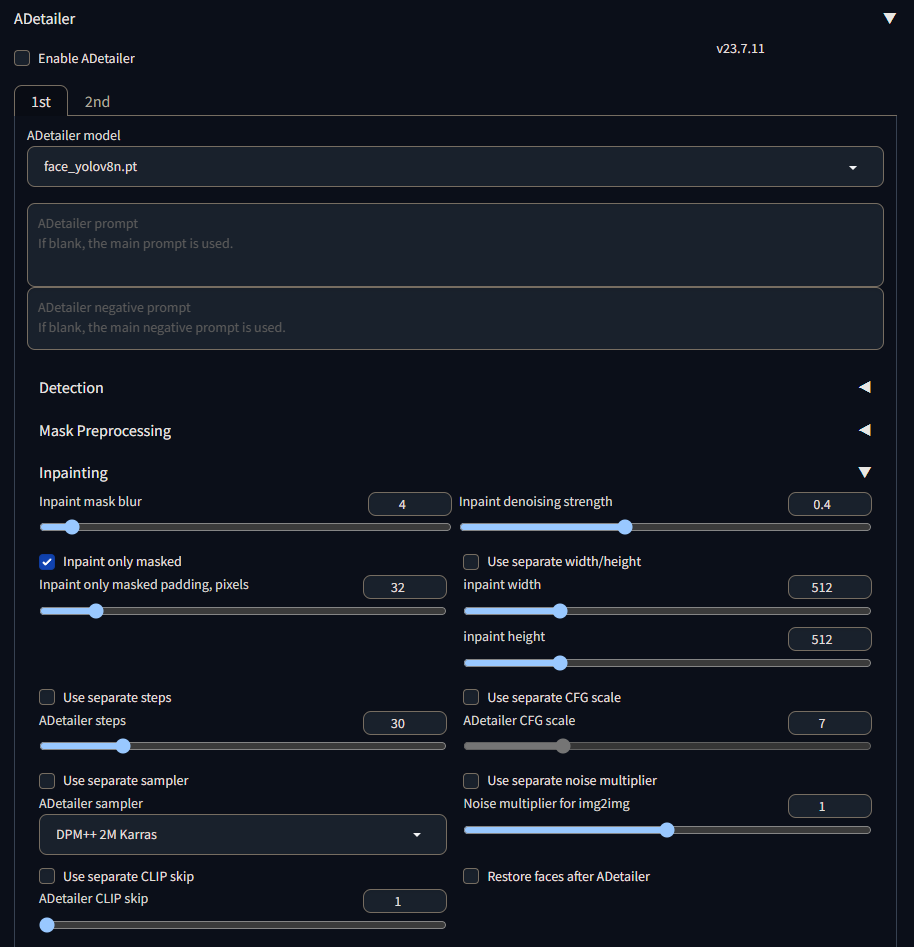
First, enable ADetailer and leave all the settings' as-is on your screen. Really the only part you want to modify here is Inpaint denoising strength to control the denoising of our second passthrough. For Bronya, I started around 0.6 for most expressions but others required more de-noise. This will be trial and error on your end to get what you want.
The second important prompt will be the Adetailer prompt. Here is where you want to define the expressions for your character here. First, start with face, then add characteristics of the characters' own expression. In the case of Bronya, to make her gratitude expression, I decided to use this prompt in Adetailer.
face, (closed eyes:1.5), (blush:.8), happy, open mouth
If you noticed, there is now the presence of parenthesis and :X.X in the prompt. Parenthesis adds emphasis to the word you wish to see, thus the more parenthesis, the more emphasis the AI will focus on it. The :.X and :X.X are basically a old form of emphasis which is used to tell the AI how much it should focus on the prompt by a value. Thus for closed eyes, I emphasized it with both parenthesis and a emphasis scale of 1.5. The same goes for blush but I instead used :.8 to reduce emphasis on the word itself.
With these settings adjusted and the prompt, go ahead and generate your new image. You should see it go faster since we are barely painting anything at the start but a second pass will happen which may take a bit more. In the end you should get your image of your choosing which, for my Bronya, would be this.
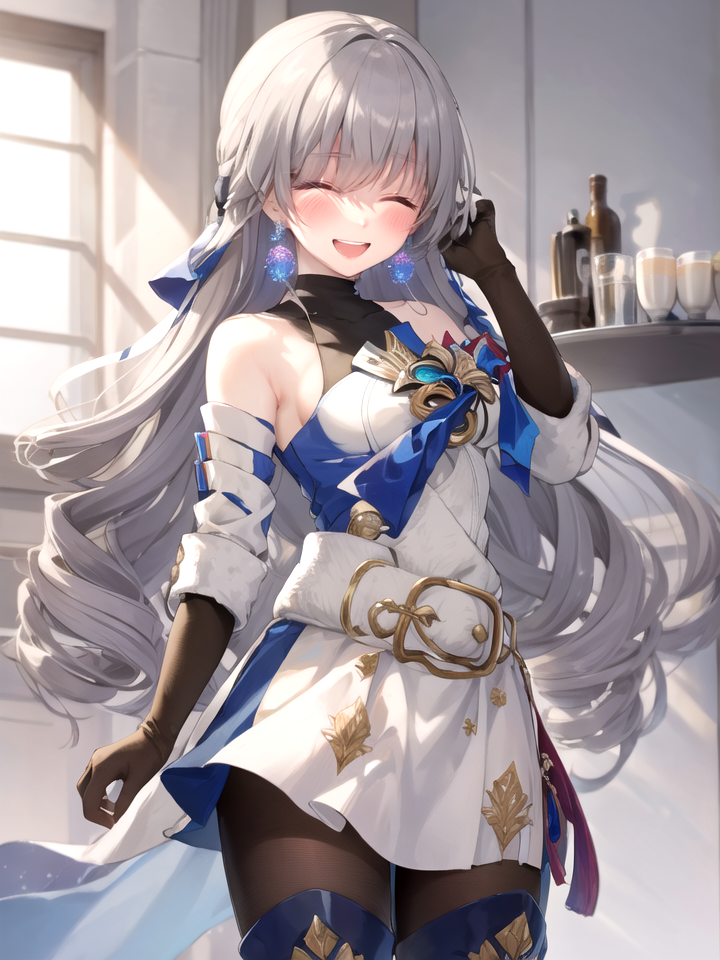
Happy Bronya Best Bronya :) <3
As you can see, her face is completely different from what we originally made in txt2img whilst her outfit stays the same. This is why we inpaint instead of doing img2img directly. With this now sorted, we can generate the rest of our expressions for our sprites. In SillyTavern, we have two choices of expressions.
- 6 expressions
- 28 expressions
While there may be more options, we suggest going with the 28 expressions as this is the most commonly used expression pack. Below will be the expressions types for each section and some examples from my Bronya image outputs.
If you use a LoRA, I recommend adding the LoRA to parts that differ from the original character which you see with
grey eyes+<lora:bronyarand:.8>. If you don't use a LoRA, exclude this part in your results and rely on normal words and enforcement.
We recommend using the default expressions as a base to create your expressions. The default expressions can be found in
[SillyTavern Folder]/public/img/default-expressions.
The example prompts are ones that I used for Bronya. This may differ for other characters, models and seeds. Use them only as reference when making your sprites.
You may notice that some examples have a+in them. What this does is tell Stable Diffusion to make your character based off a combination of expressions. This may be useful in order to create your expressions in the style of what you want.
It is recommended to save your expression images as the name of the expression for ease-of-copying in the later steps in Post-Creation.
Make sure the name of the expression is in lowercase when you are saving your results to your computer.
| Expression | Adetailer Example Prompt w/ Bronya |
|---|---|
| Anger | face, grey eyes+<lora:bronyarand:.8>, (angry:.95), closed mouth, (lowered eyebrows) |
| Fear | face, grey eyes+<lora:bronyarand:.8>, (panicked:1.5) |
| Joy | face, grey eyes+<lora:bronyarand:.8>, (happy:1.25), open mouth |
| Love | face, (closed eyes:1.5), (blush:.8), slight smile, closed mouth |
| Sadness | face, grey eyes+<lora:bronyarand:.8>, sad, (crying:1.2) |
| Surprise | face, grey eyes+<lora:bronyarand:.8>, (:o), smile |
Some expressions contain a
*in them. These expressions require some improvisation using different prompts in order to produce the right look. Do not copy the*icon and make sure the name of the expression is in lowercase when you are saving your results to your computer.
| Expression | Adetailer Example Prompt w/ Bronya |
|---|---|
| Admiration* | face, grey eyes+<lora:bronyarand:.8>, blush, (raised eyebrows:1.4), smile, (open mouth:.94) |
| Amusement* | face, (closed eyes:1.5), open mouth, slight smile, (^ ^) |
| Anger | face, grey eyes+<lora:bronyarand:.8>, (angry:.95), closed mouth, (lowered eyebrows) |
| Annoyance | face, grey eyes+<lora:bronyarand:.8>, (frown:1.38), closed mouth |
| Approval* | face, (closed eyes:1.5), smile, (open mouth:.9), (^ ^) |
| Caring* | face, (closed eyes:1.5), happy |
| Confusion | face, confused, grey eyes+<lora:bronyarand:.8>, (raised right eyebrow:1.3), (lowered left eyebrow:1.3) |
| Curiosity* | face, (open mouth:.6), grey eyes+<lora:bronyarand:.8>, (raised right eyebrow:1.3) |
| Desire* | face, grey eyes+<lora:bronyarand:.8>, (half-closed eyes:1.7), (slight smile:1.3), (open mouth:1.05), (blush:1.4) |
| Disappointment* | face, grey eyes+<lora:bronyarand:.8>, (glaring:1.09), (open mouth:.7) |
| Disapproval* | face, grey eyes+<lora:bronyarand:.8>, glaring:1.1, lowered eyebrows, (open mouth:.76) |
| Disgust | face, (half-closed eyes:1.5)+grey eyes+<lora:bronyarand:.8>,(wince:1.5)+clenched teeth |
| Embarassment | face, grey eyes+<lora:bronyarand:.8>, (embarassed:1.4), (shy:1.5) |
| Excitement | face, grey eyes+<lora:bronyarand:.8>, (excited:1.4) |
| Fear | face, grey eyes+<lora:bronyarand:.8>, (panicked:1.5) |
| Gratitude* | face, (closed eyes:1.5), (blush:.8), happy, open mouth |
| Grief | face, (closed eyes:1.5), (:\(), crying |
| Joy | face, grey eyes+<lora:bronyarand:.8>, (happy:1.25), open mouth |
| Love | face, (closed eyes:1.5), (blush:.8), slight smile, closed mouth |
| Nervousness | face, grey eyes+<lora:bronyarand:.8>, (clenched teeth:.68), (shy:1.6), (blush:1.4), (open mouth:.65) |
| Neutral | face, grey eyes+<lora:bronyarand:.8>, emotionless |
| Optimism* | face, (closed eyes:1.5), raised eyebrows, smile, (open mouth:.75) |
| Pride* | face, (closed eyes:1.5), raised eyebrows, smile, closed mouth |
| Realization* | face, grey eyes+<lora:bronyarand:.8>, raised eyebrows, (:o) |
| Relief* | face, (closed_eyes:1.6), happy, (open mouth:.7) |
| Remorse* | face, (sad:1.5), (closed eyes:1.6) |
| Sadness | face, grey eyes+<lora:bronyarand:.8>, sad, (crying:1.2) |
| Surprise | face, grey eyes+<lora:bronyarand:.8>, (:o), smile |
¶ Overall
Now that you finished making all your expressions, you are officially done with this section! Congratulations! Now let's finish this guide off with Post-Creation where we remove the backgrounds from our characters and add them into SillyTavern!
Previous Step
Next Step